How to Use Bitcoin SegWit Transactions: a Guide


You’ve probably heard and read the term “SegWit” quite a few times lately. We’ve seen the reports saying that transactions via SegWit are rising, and many in the Cryptoverse have been singing praises to this upgrade, urging platforms and networks left and right to integrate it. Even Binance CEO Changpeng Zhao (CZ) seems to be thinking about adding it to his own platform. Yet, explanations on how to actually use it are surprisingly few. Let’s change that.

What is it?
First, let’s shortly see what we are talking about here. As we know, there’s a myriad of cryptocurrencies out there and each crypto has its own protocol, which is, simply put, a set of rules they must follow. And this is where Segregated Witness (SegWit) comes into play. It’s an optional protocol upgrade to blockchain networks, first activated in 2017 on the Litecoin and then on the Bitcoin networks. As ‘segregate’ means to separate, while witnesses are the transaction signatures, hence SegWit stands for “to separate transaction signatures.”
Every block has a digital signature (witness) of the sender as a part of the transaction data, which is important for the validation process, but takes up a whole lot of space – about 60% of transaction data. Thanks to SegWit as a process, signature data from transactions are removed, freeing up space for more transactions per block, meaning that a blockchain will see an increase in its block size limit.
Why is it useful? Four words: malleability, cost, speed, and scalability. When you have more capacity for more transactions to be stored, you get more transactions per block, faster transactions, and lower transaction fee. However, SegWit as a concept was originally formulated by Bitcoin developer Pieter Wuille, and it was meant to protect users from transaction malleability – a type of attack that allowed someone to change a unique identity of a Bitcoin transaction.
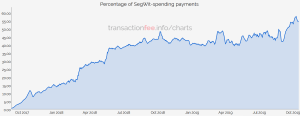
And while many believe that SegWit, in combination with the Lightning Network will allow for millions of transactions per second to be processed, SegWit has also caused friction in the Cryptosphere, followed by hard forks. The critics also claim that this update is not enough to change the issues Bitcoin is facing with scalability.
How to use it?
Now that we know what it is, let’s move on to how to use it. It’s actually quite simple, and large majority of it is automatic – meaning, that all you have to do is set it up, and off you go transacting while striping your signature off the data and enjoying lower fees.
Step 1: Get a wallet that supports SegWit transactions or upgrade the one you own
SegWit has come a long way since 2017, but not all wallets have it as an option. Some that do include Trezor, Ledger, Samourai Wallet, Electrum, KeepKey, and quite a few others. We advise you research a wallet before a purchase, to find the one that suits you on all its aspects.
If you already have a wallet that supports SegWit, but don’t see it as an option, you likely just need a software or a firmware update (depending on whether you have a software or a hardware wallet), but there shouldn’t be a need to download or purchase a different wallet. To update it, you simply need to follow the guides provided by each specific wallet.
Step 2: Create a new account
Now that you’ve downloaded your new wallet or upgraded your old one, it’s time to create a new SegWit account to move your funds to – yes, even if you haven’t downloaded any new software or purchased a new device, you need to create a separate account and address. This step may slightly differ from wallet to wallet, but these differences are usually minor and shouldn’t pose a problem. Before creating the account, some wallets will ask you to choose a cryptocurrency and your device type though.
Then, you are likely to be offered two sets of accounts:
- Your old account, called a Legacy account – no matter how many you have, don’t worry, they are safe and will remain absolutely the same, as the update has no effect on them; they will just not be able to support the new features;
- Your new SegWit account – the option we’ll be choosing here.
For those wondering if they can make multiple SegWit accounts – you can. This will also depend on the wallet, but the basic premise is that you will just need to repeat the steps we’ve outlined for each account you want to make, and likely change the derivation paths for which your specific wallet should also have a guide.
Step 3. Generate a SegWit address
We have an account, now we need an address. Make sure to follow the instructions by your wallet on how to generate an address. With some wallets, after you’ve finished making an account, all you need to do is click on it and verify it through prompts, and that’s it. However, you may also be asked to choose the address format.
There are three address types – you might be offered two, or all three – and you’ll recognize which type is which right away based on their formats. Knowing how to differentiate them is relevant, not only for the sake of choosing the one you want, but for knowing what each can do and what kind of transactions you can make with each of them.
- Legacy address (P2PKH) – original BTC address; starts with a 1; all wallets support sending to and receiving from these addresses; these are not SegWit transactions.
- Nested SegWit address (P2SH-P2WPKH) – starts with a 3; it’s not the SegWit standard, but it comes with full compatibility; P2SH (Pay To Script Hash) doesn’t mean SegWit only (it can also be a multi-signature address), but you’ll recognize SegWit as it’s P2WPKH nested into P2SH; may appear on your device only as “SegWit”; supported by a number of exchanges and wallets.
- Native SegWit address (bech32) – starts with bc1; this prefix is reserved strictly for SegWit addresses (this is ‘real’ SegWit, so to say); also known as the bech32 address; supported by few wallets and exchanges.
4. Move the funds to your new SegWit account
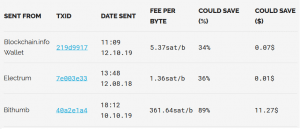
This is the last step. To start using SegWit, you must transfer funds, that is, send a P2PKH payment from your Legacy account to this P2SH-P2WPKH address like you would complete any other transaction. In short, send your money there first. After this step, you can send and receive funds via this latest address format and with lower fees that come with it.
As mentioned, though, not all wallets and exchanges support nested SegWit, and very few support native SegWit. While the number of those that to support it grows, it is something to take into consideration when it comes to fees. Depending on what type of transaction it is, the fees will logically be lower or higher. The source matters here. So if you make a transaction with another SegWit address, good for both of you, as it’s a SegWit transaction, and you’ll pay less. If you send some money from your SegWit address to a Legacy address, it’s still a SegWit transaction, and you’ll pay less. But, if you have a Legacy address and you send some funds to a SegWit address, that’s not a SegWit transaction, hence low fees do not apply.
What if you haven’t or don’t want to upgrade your wallet? Or you want to, but you are worried about the possible incompatibility issues? ‘But what if my mate sends me some sats from his SegWit address, or I want to send some to them,” I hear you ask. The good news is that one of the best things about SegWit is that it’s a soft fork and P2SH address format is backwards compatible – and this means that you all can transact with everybody else regardless of the address format.
There are some differences of course, besides the fees. For example, if you don’t upgrade and a SegWit address sends you BTC, your wallet may not show the payment until after it has been included in a block, as it needs to be confirmed by a miner, as Bitcoin Core explains.
The bad news? As said, the native SegWit option is still quite limiting, though the future is looking bright for it too. In the meantime, you may experience issues even if you’ve done all the steps correctly on your side. You may find that you can’t send to or receive funds from certain addresses, though technically you should be able to. The reasons for this are various, and many remain unknown, as those who haven’t completed an update may not look into why the transactions concerning updated wallets don’t work. Many people blame sites’ easily solvable validation issues for causing such problems, as these sites are unable to recognize SegWit addresses, particularly native ones. Whatever the reason, you can always use your Legacy address in case of a problem, until SegWit upgrades become more common and its usage smoother, as many hope it will.
__
Let us and your fellow readers know in the comments if you’re planning to start using SegWit, and if you already do – what’s your opinion on it so far, have you run into any issues, and how did you solve them.
- Sam Altman ChatGPT AI Predicts Stunning Bitcoin Price By End Of 2026
- Mark Zuckerberg META AI Predicts Incredible XRP Price by End of 2026
- Mark Zuckerberg META AI Predicts Surprising Bitcoin Price by End of 2026
- XRP Price Prediction: Ripple Taps Indonesia, Philipines, and Vietnam Market
- Can Charles Hoskinson Really Rescue Cardano?
2M+
250+
8
70


- Sam Altman ChatGPT AI Predicts Stunning Bitcoin Price By End Of 2026
- Mark Zuckerberg META AI Predicts Incredible XRP Price by End of 2026
- Mark Zuckerberg META AI Predicts Surprising Bitcoin Price by End of 2026
- XRP Price Prediction: Ripple Taps Indonesia, Philipines, and Vietnam Market
- Can Charles Hoskinson Really Rescue Cardano?
More Articles